

Technical Guide
Know the basics, but not why a team works? Learn to read a fight, check which effects stack, and calculate what your equipment actually provides.
Adapted from Monokhrome's Grand Summoners Technical Guide, a work in progress dated June 24, 2025. Screenshots come from that version; open an image to see it at full size.
On this page
Before you start
This guide builds on the General Guide. Use it when you understand Arts, equipment, and team roles, but want to know why a strategy succeeds or fails.
The original is an older community reference. Use its screenshots to recognize controls, and check current in-game descriptions for a unit’s exact values, exceptions, and available rewards. The examples below explain the mechanics; they are not a current equipment shopping list.
If a team is struggling, start with three questions:
- What does the boss do? Read the battle log and watch its HP thresholds.
- Do your effects work together? Two buffs with similar descriptions may replace one another.
- Is your protection ready when you need it? A strong defensive equip still leaves you exposed while it is on cooldown.
Settings that help you understand a fight
Show the timer and battle statistics
In the battle options, enable the timer setting shown as Time Attack Mode in the source screenshot. It helps you compare clear times and notice when a boss changes behavior.
Under Details, enable Show in Battle to display damage dealt, damage taken, healing, and Break totals. Choose an opacity you can read without hiding the fight.

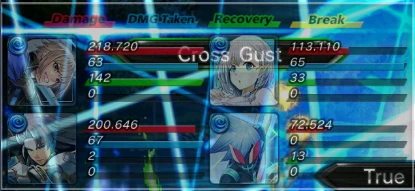
Treat those totals as clues. High damage taken might point to missing resistance; low damage might mean a boss is resisting your attacks. The totals alone do not explain the cause.
Read the battle log
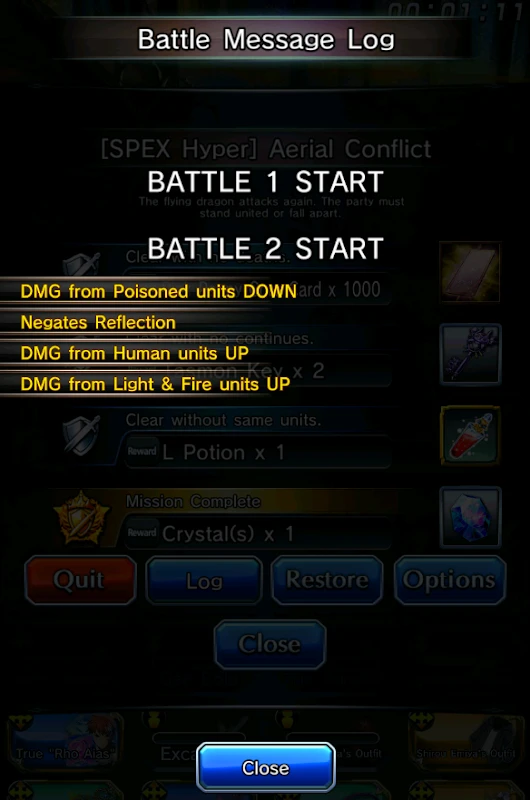
When a quest goes wrong, pause and open Logs. Look for messages about resistances, immunities, damage types, and phase changes before swapping units at random.
Make repeated runs less cumbersome
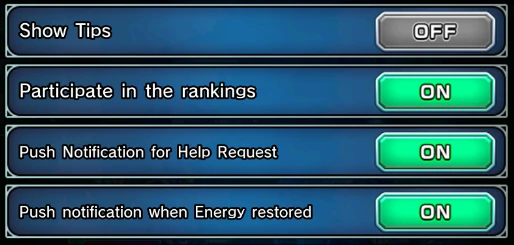
Turn Show Tips off if you want to reach the results screen sooner. Help-request notifications, Energy-restored notifications, and leaderboard participation are optional; enable the ones you want.
Organize your units and equipment
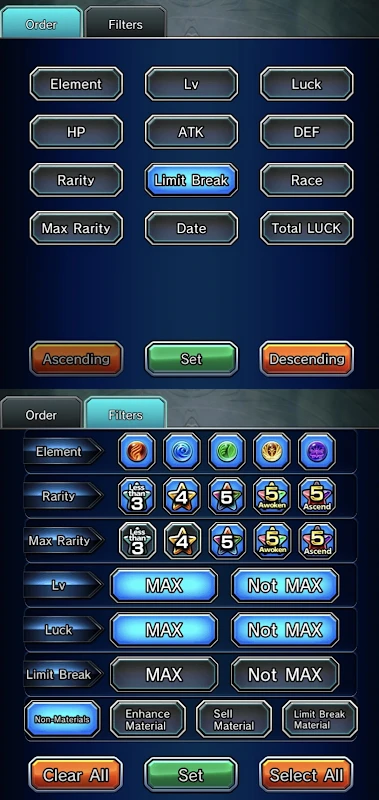
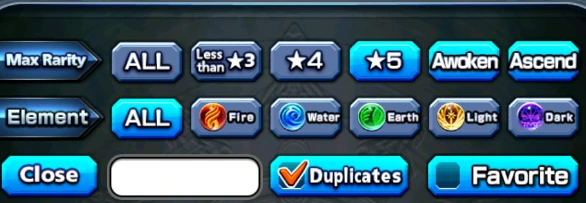
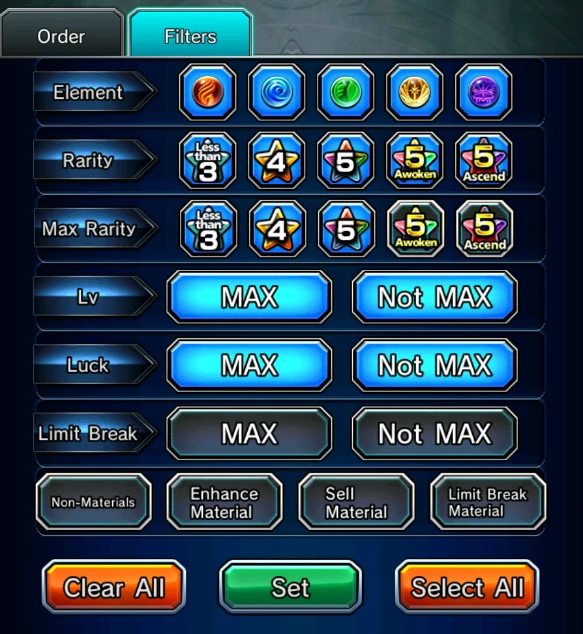
Filters help you find candidates. They do not decide what is safe to sell or fuse: keep valuable units locked and review the confirmation screen.
Unit filters by task
| Task | Useful filter and sort |
|---|---|
| Build a team or show your collection for advice | Filter for valuable units by Max Rarity, then sort by Limit Break, descending. Level is another useful sort for your own browsing. |
| Find duplicates to limit break | Enable Duplicates, then sort by Limit Break, descending. Check which copy you are keeping. |
| Level units with Metal Chickens | Show Lv Not MAX, exclude Ascended units, and sort by Level. Ascended units gain levels through quests. |
| Find units ready for evolution | Show Lv MAX, then inspect each unit’s next evolution and material requirements. A max-level filter is a shortlist, not proof that every unit can evolve. |
| Review recent ordinary summons for sale | Sort by Date, descending, and exclude valuable Max Rarity categories. Check the Alch value before selling. |
Current rarity and Max Rarity are different. An unevolved unit may be worth keeping even when it has fewer than five stars. The keep-or-sell section shows how to recognize these units.
Equipment filters by task
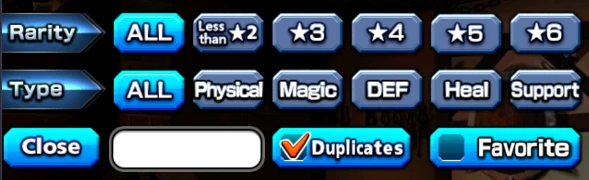
| Task | Useful filter and sort |
|---|---|
| Choose an equip | Filter by equip type, then sort by Rarity, descending. Check that the unit’s slot accepts it. |
| Enhance new equipment | Sort by Date, descending, to find recent drops. |
| Find limit-break materials | Enable Duplicates. Keep any extra usable copies you still need before fusing them. |
| Review equipment for sale | Sort by Date and inspect the effects. A duplicate or low-rarity equip is not automatically useless. |
Damage, elements and critical hits
Elemental matchups
Fire, Water, and Earth form a cycle: Fire → Earth → Water → Fire, with each element strong against the next. Light and Dark are strong against each other.
The source describes a 20% damage advantage against a weak element. Don’t turn that into a universal rule that the attacker also takes 20% less damage: Light and Dark’s relationship is mutual, and bosses can have their own resistances.
Choose a team for the boss’s mechanics and your units’ roles first. Element alone rarely explains whether a team will work.
Battle Ether is a bonus, not a plan
The yellow orbs dropped during attacks are Battle Ether (BE). The source describes each orb as giving 10 Arts to a randomly selected unit.
That randomness matters for a nuke: a setup intended to defeat the enemy in one short burst. Count only dependable Arts from skills, equipment, and passives when checking whether your damage dealer can act. A run that needs lucky BE drops is not a consistent farm.
Critical and Super Critical hits
Standard critical hits ignore enemy DEF and have a base damage bonus; the source gives that bonus as 25%. Boss critical resistance and other mechanics can still stop a critical-based plan from working.
Super Critical rate is a separate effect. The source explains that a hit must first be critical before it can become Super Critical. Supplying Super Critical rate alone does not replace the need for ordinary critical rate.


Don’t read either damage number in these screenshots as a multiplier test. They show the labels to recognize, not two otherwise identical attacks.
Barriers, resistance and taunt tanks
These protect your team in different ways:
| Effect | What it does | What to watch for |
|---|---|---|
| Damage resistance | Reduces the relevant incoming damage. | Check whether it covers all damage, physical, magic, or one element. |
| Barrier / damage negation | Absorbs damage up to a stated amount. | It can run out before its duration ends. |
| Taunt / damage redirection | Moves allies’ incoming damage onto one unit. | That unit needs enough protection to survive the combined hits. |
A barrier has its own bar above the unit’s HP. The source uses light blue, dark blue, purple, and red for progressively larger barriers relative to the unit’s HP. Use the bar to watch remaining protection; color alone is not a reason to ignore the next attack.

Why adding another barrier can make you weaker
Ordinary team barriers generally replace an existing barrier instead of adding their values. A weaker barrier cast afterward can therefore reduce your protection. The source identifies taunt barriers as an exception that can coexist with teamwide barriers.
Check the effect text before combining barrier units, and watch the timing in Auto or AI. Two units repeatedly overwriting each other’s protection may be less useful than one barrier plus damage resistance.
Attacks barriers do not solve
Burn, Poison, and other HP-draining effects can bypass barrier protection. Damage redirection is not a general solution to damage over time either; check how the particular boss applies it.
Look for Ignore Barrier, Cancel DMG Negation, or killer effects aimed at shielded or taunting units in the log. A taunt tank that works elsewhere may be the wrong answer to that fight.
Which buffs stack?
Stacking means both effects contribute at the same time. Similar wording does not guarantee that they stack, and different wording does not automatically prove that they do.
Active buffs, passives and Arts generation
| Effects you are combining | Starting rule from the source |
|---|---|
| Two ordinary Arts buffs of the same effect | Usually do not add together; the stronger effect applies. Check for explicit exceptions. |
| Two passives with the same name | Usually only the stronger version applies. |
| Passives with different names that raise the same stat | Can stack. Check any restrictions in their descriptions. |
| A passive and an Arts buff | Can stack even when they affect the same stat. |
| Arts generation over time | Uses its own types and exceptions. See Arts generation. |
Two examples make the distinction easier:
- Equip cooldown buff: the source compares a 60% buff from Sublime Supernova Liza with a 40% buff from War Hero Fen. When those effects overlap, use 60%, not 100%.
- Starting Arts passives: the source contrasts two versions of Arts gauge Master, which do not add together, with Tactics plus Arts gauge Master, which can.
Use these as examples of the rule, not proof that every future skill follows it. Read the current descriptions on Units and Equip.
Read the small print
| Wording | How to interpret it |
|---|---|
| Only once | In the source’s passive examples, duplicate copies of that effect do not all trigger together. Read what the restriction applies to. |
| First time only | The bonus happens on the first activation, not on every use. |
| Stacks | Multiple applications can coexist. A timed stack still expires; repeated use does not automatically make it permanent or unlimited. |
| MAX …% | Repeated applications can build toward the stated cap. Check duration and whether the effect is permanent. |


Cooldowns and continuous protection
An Equip or Skill CT buff speeds up cooldown recovery. A 100% CT buff halves the cooldown; it does not remove it.
For the cooldown-speed effects described in the source:
Effective cooldown = base cooldown ÷ (1 + speed buff as a decimal)
A 40% buff is 0.40 in this formula. For a 35-second equip:
35 ÷ (1 + 0.40) = 35 ÷ 1.40 = 25 seconds
Use the cooldown at the equip’s actual limit-break level. First combine only the buffs that really stack; do not add every percentage on your team screen.
| Speed buff | Cooldown multiplier | A 30-second equip becomes |
|---|---|---|
| 0% | 1 | 30 seconds |
| 10% | 1 ÷ 1.10 | About 27.27 seconds |
| 25% | 1 ÷ 1.25 | 24 seconds |
| 40% | 1 ÷ 1.40 | About 21.43 seconds |
| 50% | 1 ÷ 1.50 | 20 seconds |
| 100% | 1 ÷ 2 | 15 seconds |
Compare duration with cooldown
Uptime is how long the effect lasts. Downtime is the gap after it ends and before you can apply it again.
For an equip with a 20-second effect and 30-second base cooldown:
- With 40% cooldown speed, it is ready after about 21.43 seconds: a 1.43-second gap remains.
- With 50%, it is ready after 20 seconds: continuous coverage is theoretically possible.
The original says 40–50% can cover this example. Its own formula shows that 50% is the threshold. In practice, delayed activation, missing buff uptime, or a disabling ailment can still leave a gap.
For a 15-second effect on a 30-second cooldown, the same calculation needs 100% speed. That is why duration matters as much as the headline resistance value.
Crest cooldown bonuses have their own restriction
The source notes that overlapping cooldown effects from crests do not add together, including an Equip or Skill CT crest paired with Magic Circuit γ2. Don’t count the same cooldown benefit twice when calculating a setup.
Boss HP thresholds and Break
Bosses show both HP and a Break gauge. They measure different things.


HP diamonds warn you about a transition
Diamonds on an HP bar mark thresholds where the boss may interrupt the normal flow of battle. The source describes thresholds with forced Arts and invulnerability; blue markers can indicate a different rule, such as a threshold that can be interrupted by Break.
Treat the marker as a warning to check that boss’s mechanics. Don’t assume every diamond uses the same protection or interruption rules.
Before pushing the boss through a threshold, check that your defensive equip or protective Arts is ready. Spending everything just before a forced attack can lose an otherwise stable run.
Damage and Break are separate
An attack has a damage value and a separate Break value. Increasing damage does not automatically increase Break. Break buffs, Break resistance, and Break-resistance debuffs affect how quickly the gauge empties.
When it empties, the boss enters BREAK, normally pausing its attacks briefly and taking increased damage. Some bosses specifically require Break or change behavior after it.
Bring a breaker when that mechanic matters. For a boss that does not require it, steady Arts generation, damage, or protection may do more for your team.
Read status effects before changing your team
Buffs and debuffs appear around the unit portraits. Open the details or log to identify an unfamiliar effect rather than relying only on its color.

Common buffs and debuffs
| Effect family | What it changes |
|---|---|
| ATK / DEF | Attack or defense stats. These are different from damage dealt or damage taken. |
| Damage UP / resistance DOWN | Your damage output or the target’s vulnerability. Match physical, magic, and elemental effects to the attack. |
| Damage resistance / physical, magic, or elemental resistance | Incoming damage of the stated kind. |
| Accuracy / evasion | Whether an attack connects. More damage cannot fix an attack that misses. |
| Critical rate / critical resistance | Whether a hit becomes critical. Critical damage is a separate bonus. |
| Break power / Break resistance | How quickly the boss’s Break gauge is depleted. Lower boss Break resistance makes breaking easier. |
| Auto-fill Arts / Arts drain | Gauge gained or lost over time. Arts-generation inversion can turn a generation buff against you. |
| HP recovery / lifesteal | Healing over time or healing tied to damage dealt. Read the trigger and restrictions. |
| Max HP UP | Raises maximum HP; the source also describes healing by the added amount. |
| Revive / survive lethal damage | Different recovery effects. A true revive can still count as a death for a no-deaths objective. |
| Bleed | The source describes increased damage taken per stack. Don’t mistake it for ordinary Poison. |
Healing labels need care. Outgoing healing, healing received, self-healing, and lifesteal are not interchangeable. The source’s healing table mixes some of these descriptions, so check the actual skill text before assuming a bonus improves all healing.
Ailments and what they stop you doing
| Ailment | Main problem | Useful distinction |
|---|---|---|
| Burn | Damage over time. | The source describes ordinary Burn as stopping at 1 HP, with Burn and Freeze canceling each other. |
| Poison | Damage over time. | Ordinary Poison stops at 1 HP in the source; Envenom is a separate, lethal variant that cannot be cleansed normally. |
| Blind | Attacks can miss. | The source gives ordinary Blind a 30% miss chance. Damage buffs do not solve missed attacks. |
| Freeze / Paralyze | Prevents acting and using equips; can interrupt an attack. | Protect against the specific ailment. Ultimate Freeze also lowers critical resistance in the source. |
| Disease | Severely reduces healing received. | The source gives an 80% reduction. Check that your cleanse includes Disease. |
| Curse | Prevents equipment use. | A cleanse equip on the cursed unit cannot solve the problem while it is unusable. |
| Seal | Prevents Skills and Arts. | Equipment may still provide an answer. |
| Faint | Stops actions and equipment use. | Ordinary resistance and cleanse effects generally exclude it; plan around the attack that causes it. |
Read exceptions such as “except Faint” and “except Disease”. A cleanse that removes one problem may leave the other in place. Likewise, do not assume every HP-drain effect obeys ordinary Burn or Poison’s nonlethal rule.
Compare equipment with Arts per second
Arts per second (APS) measures average gauge supplied over repeated uses. Keep two numbers separate:
- Per-unit APS: how much one affected unit receives.
- Team-total APS: the sum across all affected units.
For an effect that gives Arts over time:
Arts per use = Arts each second × effect duration
Per-unit APS = Arts per use ÷ effective cooldown
Team-total APS = per-unit APS × number of recipients
For instant Arts, use the instant amount as “Arts per use.” Multiply by four only if the effect actually reaches all four units.
Worked examples from the source
| Equip example | Calculation | Average output |
|---|---|---|
| True “Shadow Cutter”: 10 Arts, 20-second cooldown | 10 ÷ 20 | 0.50 APS for its recipient. |
| True “Izanagi”: 2 Arts/s for 3 seconds, 10-second cooldown, 15% equip cooldown speed | (2 × 3) ÷ (10 ÷ 1.15) | 0.69 APS for its recipient. |
| Milim’s Clothes: 5 Arts/s for 10 seconds, 45-second cooldown, four recipients | (5 × 10) ÷ 45 | 1.11 APS per unit, or 4.44 APS across the team. |
The original Milim’s Clothes line prints 5 ÷ 10. That should be 5 × 10: the effect supplies 50 Arts to each recipient per use.
When APS is the wrong comparison
A high average does not tell you when the Arts arrives. Instant Arts is often more useful for a fast opening, even if its long-term APS is lower.
Also check:
- Recipients: self-only generation cannot start the other three units.
- Conditions: count only the bonuses your team actually qualifies for.
- Stacking and overlap: this simple formula assumes the effect runs for its stated duration without being overwritten or wasted.
- First-use bonuses: useful for a nuke, but not something to count on every cycle.
- Cooldown-buff uptime: a buff that expires halfway through farming does not provide its full advertised speed all the time.
What makes an equip useful?
Start with the problem your team needs to solve. Then compare the equipment’s effects, slot requirements, duration, and cooldown.
| Type | Useful things to look for |
|---|---|
| Physical / Magic | Reliable Arts, strong resistance debuffs, fast wave-clearing attacks, or a specific utility effect. |
| Defense | Enough resistance for the incoming hit, good duration relative to cooldown, and helpful extras such as ailment protection. |
| Support | Arts for the right recipients, with healing, damage buffs, or protection as a second benefit. |
| Heal | Enough healing when you need it, a short cooldown, and a cleanse that covers the actual ailment. |
| True Equip | A valuable unit-specific passive or an active effect useful even on other units. |
A short, strong resistance buff may be excellent for surviving one boss Arts and poor for continuous protection. A support equip that also heals may free you to use a different fourth unit.
Players sometimes call equips with a 50-Arts first-use bonus “Trikes,” after Black Trike. Their opening burst is the attraction; don’t treat that bonus as repeatable generation.
Crossover equipment can be hard to replace later, but availability alone does not make it a good purchase. Check which units you own, whether a farmable option works, and how many crystals or Rainbow Gems you can spare. Rerun schedules are not guaranteed.
When crest farming is worth your time
Crests are a later optimization. First finish urgent event rewards, essential awakening materials, and useful farmable equipment.
A practical readiness check:
- You can clear the chosen Crest Palace reliably on Auto.
- Your farming team leaves room for the unit receiving the crest, which should be the leader.
- You can afford the Energy or potions without sacrificing a more useful farm.
- You have compared actual repeat-run speed, including loading and results screens.
The source suggests very fast PRO or EXT clears, a half-Energy campaign, and plenty of spare potions. Those are efficiency goals, not requirements to enter the quest.
PRO versus EXT
EXT is harder and, in the source, has a better chance of dropping level 4 crests. That does not automatically make it the better farm: a slow or unreliable EXT clear can lose to fast PRO runs. Check the current Energy cost and campaign before choosing.
A Player EXP Up crest can help with rank gains while farming. It is optional, and the screenshot’s effect applies when the unit is the leader.

The source estimates a roughly 1-in-20 chance for a dropped crest to be a “+” version. Treat that as a community estimate, not a guarantee after 20 runs. Multiplayer players can receive different results.
Nova and Crest Burst
A Crest Burst can upgrade an eligible leader’s level 4 crest to level 5, or level 4+ to level 5+. The source describes it as rare, with a random eligible crest selected when there is more than one.
If you are specifically farming for 5+, bring a leader with a 4+ crest and check the other crest slots. A regular level 4 crest may also be eligible, so it can receive the burst instead. Don’t remove a useful crest without deciding whether that tradeoff is worthwhile.

Nova runs can take much longer than ordinary crest farms. Get a useful basic crest first, then decide whether the potential upgrade is worth the time. A burst is not a promised reward for a fixed number of clears.
Compendium farming
The source describes unit Compendium rewards earned through repeated quest clears, with a target of 2,000 clears per unit for the full set it discusses. Check each unit’s current Compendium reward track before starting a long farm.
Simple setup: Night Stroll
The source recommends Night Stroll, the first stage of Juno’s Side Story:
- Put four units whose clear counts you want to raise into the team.
- Give a compatible unit a fast, strong attack equip that can clear the stage. The source suggests Sword of Glorious Will “Grand Destin”, from Cross the Blaze Episode 3.
- Test that Auto uses it correctly and clears reliably.
- Repeat, check the Compendium counts, and claim rewards as milestones unlock.
At an assumed 30 seconds per full run, 2,000 runs take 16 hours 40 minutes, progressing four units together. Measure your own full loop; battle time alone excludes loading and results.
More setup: Cross Battle
The source’s advanced route is Exploring → Training → Cross Battle:
- Build the first team around a fast damage dealer with dependable opening Arts.
- Use the other three slots for the equipment and buffs needed to finish the fight. Add critical support if the setup requires it.
- Fill the second team with four more units whose counts you want to raise.
- Test a clear and confirm which units receive Compendium progress before committing to a long run.
This can progress seven farming units plus the damage dealer, if the damage dealer’s own rewards are already finished. It requires more preparation than the one-equip Side Story approach.
| Source timing assumption | Time for 2,000 runs | Farming units progressed together |
|---|---|---|
| Night Stroll: 30 seconds/run | 16 h 40 min | 4 |
| Cross Battle: 35 seconds/run | About 19 h 27 min | 7, plus the damage dealer if still needed |
Cross Battle takes longer to finish 2,000 runs, but can advance more units at once. Choose it only if your setup is consistent and its actual time per unit beats the simpler farm. Leave Compendium farming for when there is nothing more valuable or time-limited to do.